I have been battling this issue:
PHP 5.4 5.5 5.6 Nginx PHP5-FPM - 502 Bad Gateway Issue Solved
for several days. Here are the symptoms:
When you execute a PHP script it does not show any output on the browser, just WHITE PAGE!
In the Nginx log you will see error log like this:
2018/02/01 12:56:18 [error] 16526#16526: *122 readv() failed (104: Connection reset by peer) while reading upstream, client:
In the PHP FPM log you will see error log like this:
[pool www] child 21970 exited on signal 11 (SIGSEGV) after 57.041592 seconds from start
This was very difficult to troubleshoot because I literally was getting no useful clue of what is happening.
I tried to upgrade my outdated PHP from 5.4.x to 5.6 but unsuccessful because my Ubuntu server version was so old (12.04 LTS Precise Pangolin) :-(
So I dediced to keep troublshotting by process of elimination.
The breakthrough came when I disabled X-Cache extension! After disabling X-Cache my script WORKS!
At first to test I just removed all the content of the xcache module/extension. Mine was located in:
/etc/php5/conf.d/20-xcache.ini
(I emptied the file) then executed:
service php5-fpm restart
Evidently there was some kind of incompatibility or issue which happened with some other things being upgraded overtime. So I decided to just remove X-Cache all together using this command:
apt-get remove php5-xcache
service php5-fpm restart
Now all my problems have been resolved and I am happy this issue is solved!
Thursday, February 1, 2018
Wednesday, January 17, 2018
Initial steps to properly setup Ubuntu Server
Every time I deploy a new ubuntu server for some kind of web development project I always have a list of commands I have to execute to prepare the server. These are what I call initial preparation for ubuntu server. The purpose for these initial setup commands to make sure we have the latest updates, set locale settings and setup security logins.
Here are my list of commands for ubuntu initial setup (grouped by purpose)
apt-get upgrade
apt-get install build-essential
apt-get install curl
dpkg-reconfigure locales
dpkg-reconfigure tzdata
nano ~/.ssh/authorized_keys
As you can see... the commands above WILL NOT install any specific server functionality. But it will setup a solid base for you to start building whatever server you need.
Here are my list of commands for ubuntu initial setup (grouped by purpose)
Group 1 - Initial Updates
apt-get updateapt-get upgrade
apt-get install build-essential
apt-get install curl
Group 2 - Set Local Settings (language and time zone)
locale-gen en_US en_US.UTF-8dpkg-reconfigure locales
dpkg-reconfigure tzdata
Group 3 - Setup Security and Login
ssh-keygen -t rsanano ~/.ssh/authorized_keys
(optional) - to support PPA and Python
apt-get install software-properties-commonAs you can see... the commands above WILL NOT install any specific server functionality. But it will setup a solid base for you to start building whatever server you need.
Friday, October 13, 2017
Sending email using Amazon SES with POSTFIX for Ubuntu Server
Amazon SES (simple email service) is a good, cheap and reliable service from Amazon. Amazon SES is part of Amazon AWS family of services. With Amazon SES you will be able to send up to millions of email reliably.
Every Ubuntu server will need to send email to anyone in the world. Having a good reliable email server than you can rely on to relay your email is a must.
Please follow the steps below to configure your ubuntu server to be able to send email via Amazon SES while using Postfix.


Every Ubuntu server will need to send email to anyone in the world. Having a good reliable email server than you can rely on to relay your email is a must.
Please follow the steps below to configure your ubuntu server to be able to send email via Amazon SES while using Postfix.
PRE-REQUISITES
- An active Amazon AWS account
- Activate your Amazon SES service
- Verify your domain
- Verify the email addresses you will be sending from (or your recipient will reply to)
STEP 1
Creating SMTP credential.
Go to 'STMP Settings' in the SES left menu bar.
Click on the button 'Create my STMP Credentials'

STEP 2
Download the 'credentials.csv' file to your computer and open it

STEP 3
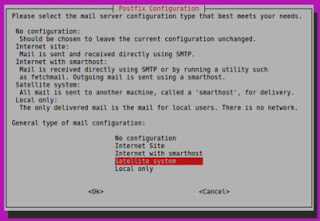
Make sure postfix, mailutils are installed on your server.
type the following command in your terminal:
sudo apt-get install postfix mailutilsif you have not installed postfix yet, it may ask you the following question (see screenshot below), make sure to answer with 'Satellite System'.

STEP 4
Using your ubuntu server's text editor (nano), edit the postfix main.cf configuration file, type in the command below:nano /etc/postfix/main.cfthen enter the following content into main.cf and erase everything else:
smtp_sasl_auth_enable = yes
smtp_sasl_security_options = noanonymous
smtp_sasl_password_maps = hash:/etc/postfix/sasl_passwd
smtp_use_tls = yes
smtp_tls_security_level = encrypt
smtp_tls_note_starttls_offer = yes
smtp_tls_CAfile = /etc/ssl/certs/ca-certificates.crt
STEP 5
Using nano again, we will edit the username + password credential file for postfix, type in the command below:nano /etc/postfix/sasl_passwordthen enter the following content into sasl_password and erase everything else:
email-smtp.us-east-1.amazonaws.com:25 {your_smtp_username}:{your_smtp_password}
STEP 6
The postfix password credential file sasl_password must be secured because it contains your Amazon SMTP credential in plain text. Type in the next few commands to secure it.
sudo chown root:root /etc/postfix/sasl_passwd
sudo chmod 0600 /etc/postfix/sasl_passwd
STEP 7
Next, we need to create the hashmap database from the Amazon SES credential file we have just edited. Then we need to secure the hashmap database file as well.sudo postmap hash:/etc/postfix/sasl_passwd
sudo chown root:root /etc/postfix/sasl_passwd.db
sudo chmod 0600 /etc/postfix/sasl_passwd.db
STEP 8
Next we need to set Postifx to use our SSL certificate, then restart postfix to use our new configurations.
sudo postconf -e 'smtp_tls_CAfile = /etc/ssl/certs/ca-certificates.crt'
sudo service postfix restart
STEP 9
Lastly we need to test by sending email to anyone, so that we can be sure our new postfix server configuration via Amazon SES is working.
echo testing | mail -s "this is our test message" -a "From: you@yourdomain.com" user@domain.com
SUMMARY
Hopefully the steps above helped you get your server sending email via Amazon SES.
If you have any comment or question, please drop me a comment. Thanks
Monday, October 2, 2017
Fix NO_PUBKEY issue in Ubuntu Server
This how to will show you how to fix NO_PUBKEY error message like this:
The error messages means apt-get update was trying to download the missing GPG keys (as mentioned in the original error message) from the Ubuntu GPG keyserver. But somehow it failed. So we will try to download (import) those GPG keys manually.
The output of the above commands should look like this:
After successfully imported the GPG Keys you should now be able to continue with 'apt-get update' without any error.
Hope this helps someone. :-)
I got the errors above while doing 'apt-get update' command.
W: GPG error: http://archive.ubuntu.com trusty-updates InRelease: The following signatures couldn't be verified because the public key is not available: NO_PUBKEY 40976EAF437D05B5 NO_PUBKEY 3B4FE6ACC0B21F32
W: GPG error: http://archive.ubuntu.com trusty Release: The following signatures couldn't be verified because the public key is not available: NO_PUBKEY 40976EAF437D05B5 NO_PUBKEY 3B4FE6ACC0B21F32
W: GPG error: http://security.ubuntu.com trusty-security InRelease: The following signatures couldn't be verified because the public key is not available: NO_PUBKEY 40976EAF437D05B5 NO_PUBKEY 3B4FE6ACC0B21F32
W: GPG error: http://archive.canonical.com trusty Release: The following signatures couldn't be verified because the public key is not available: NO_PUBKEY 40976EAF437D05B5 NO_PUBKEY 3B4FE6ACC0B21F32
The error messages means apt-get update was trying to download the missing GPG keys (as mentioned in the original error message) from the Ubuntu GPG keyserver. But somehow it failed. So we will try to download (import) those GPG keys manually.
sudo apt-key adv --recv-keys --keyserver keyserver.ubuntu.com 40976EAF437D05B5
sudo apt-key adv --recv-keys --keyserver keyserver.ubuntu.com 3B4FE6ACC0B21F32
The output of the above commands should look like this:
Executing: gpg --ignore-time-conflict --no-options --no-default-keyring --homedir /tmp/tmp.cDJgiBrsSm --no-auto-check-trustdb --trust-model always --keyring /etc/apt/trusted.gpg --primary-keyring /etc/apt/trusted.gpg --recv-keys --keyserver keyserver.ubuntu.com 40976EAF437D05B5
gpg: requesting key 437D05B5 from hkp server keyserver.ubuntu.com
gpg: key 437D05B5: public key "Ubuntu Archive Automatic Signing Key <ftpmaster@ubuntu.com>" imported
gpg: Total number processed: 1
gpg: imported: 1
After successfully imported the GPG Keys you should now be able to continue with 'apt-get update' without any error.
Hope this helps someone. :-)
Wednesday, September 13, 2017
Ubuntu Server 20.04 LTS
When is Ubuntu Server 20.04 LTS will be released?
JUNE 2020.According to the release frequency and previous history... Canonical (the company behind Ubuntu) has been releasing one version per year. For example, as of this writing 17.04 was released in June 2017. Going with this assumption, it is safe to assume 20.04 should be release around JUNE 2020.
What is the Code Name / Project Name for Ubuntu Server 20.04 LTS?
As of today (September 13, 2017) no name has been selected for Ubuntu Server 20.04 LTS.If you would like to participate in naming or help suggest a name you can go to this web page:
https://wiki.ubuntu.com/DevelopmentCodeNames
What is the difference between LTS and non-LTS server?
LTS stands for Long Term Support. For Canonical servers LTS means the product will be supported for at least 4-years! For Ubuntu Servers the LTS series are the servers with version ending in xx.04 such as 16.04, 17.04, 20.04 and so forth.Ubuntu Release Cycle
Click here to see Ubuntu Release CycleTuesday, September 12, 2017

The new Ubuntu 17.04 "Zesty Zapus" is expected to be released for beta in April 2017 and promises to be packed in new features compared to the current 16.10. Ubuntu 17.04 will include the Linux kernel 4.10.
The kernel 4.10 alone provides important new features, especially for owners of graphics cards equipped with AMD chips. However, Ubuntu 17.04 current is being equipped with Mesa 13.0.4 and the graphical server X.org 1.18.4. Canonical intends to upgrade to Mesa 17.0, but has given no indication of the future date.
Here are some quick highlights:
- Unity 8
- Linux Kernel 4.10
- Use Swap files instead of Swap partitions
- 32-bit PowerPC support is dropped
- Driverless printing
KDE, GNOME and others
As for the classic and official variants of Ubuntu, there will be many changes also, depending on the version of the environment chosen. Kubuntu now includes Plasma 5.8 (LTS) as well as the KDE Applications 16.2, the accompanying software suite.
On the GNOME side, 17.04 will bring us to version 3.23.90, which is actually the beta of the 3.24 released earlier. The Control Center is completely revamped, photos can import the snapshots, calendar re-displays the week view and a night mode will make its first debut.
Many Upgrades Everywhere
Many improvements comes with Ubuntu 17.04, spread over several areas. These include the existing applications, with the default use of LibreOffice 5.3, the presence of chrome-gnome-shell which allows the link between browsers (Chrome, Chromium, Opera and Vilvadi) and the GNOME Shell extensions, or the presence of Flatpak 0.8 for applications that take advantage of it. In addition, the DNS resolution is now provided by systemd-resolved.
Some internal changes are also worth taking notes of. For example,The graphics server is still not ready to be used by default, unlike Fedora. It can still be tested since the experimental session devoted to it. The search and indexing engine is also "sandboxed" and the new installations of the system use a swap file rather than a partition.
A few applications have been removed from the default installation, such as Brasero (burning CD / DVD), Evolution (email) or Seahorse (management of keys SSH and GPG). Others did not follow the move to GNOME 3.24 because of problems that have not been resolved. The Evolution stack remains for example in version 3.22, and others - like Nautilus and Terminal - remained at 3.20.
The final release version expected to be on April 13, 2017
The final beta is expected by March 24, 2017. There will then be the typical two-week waiting period during which many bugs and issue will be fixed. Then, the final version of Zesty Zapus will be available for download on April 13, 2017. Its support period will be of 9 months long, Canonical recommending to those needing more support period to remain on the previous Ubuntu LTS 16.04, which will continue to be supported until April 2021.
Sunday, August 20, 2017
Set local time zone for Ubuntu / Debian
Local time zone is important for many application to work properly. Proper time zone is also very important so that when you type 'date' it will not show your date and time in 'utc' time zone.
Here is the command you need to configure time zone on your Ubuntu / Debian:
dpkg-reconfigure tzdata
Subscribe to:
Posts (Atom)