Every Ubuntu server will need to send email to anyone in the world. Having a good reliable email server than you can rely on to relay your email is a must.
Please follow the steps below to configure your ubuntu server to be able to send email via Amazon SES while using Postfix.
PRE-REQUISITES
- An active Amazon AWS account
- Activate your Amazon SES service
- Verify your domain
- Verify the email addresses you will be sending from (or your recipient will reply to)
STEP 1
Creating SMTP credential.
Go to 'STMP Settings' in the SES left menu bar.
Click on the button 'Create my STMP Credentials'
STEP 2
Download the 'credentials.csv' file to your computer and open it
STEP 3
Make sure postfix, mailutils are installed on your server.
type the following command in your terminal:
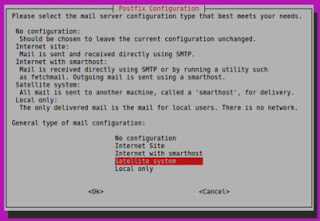
sudo apt-get install postfix mailutilsif you have not installed postfix yet, it may ask you the following question (see screenshot below), make sure to answer with 'Satellite System'.
STEP 4
Using your ubuntu server's text editor (nano), edit the postfix main.cf configuration file, type in the command below:nano /etc/postfix/main.cfthen enter the following content into main.cf and erase everything else:
smtp_sasl_auth_enable = yes
smtp_sasl_security_options = noanonymous
smtp_sasl_password_maps = hash:/etc/postfix/sasl_passwd
smtp_use_tls = yes
smtp_tls_security_level = encrypt
smtp_tls_note_starttls_offer = yes
smtp_tls_CAfile = /etc/ssl/certs/ca-certificates.crt
STEP 5
Using nano again, we will edit the username + password credential file for postfix, type in the command below:nano /etc/postfix/sasl_passwordthen enter the following content into sasl_password and erase everything else:
email-smtp.us-east-1.amazonaws.com:25 {your_smtp_username}:{your_smtp_password}
STEP 6
The postfix password credential file sasl_password must be secured because it contains your Amazon SMTP credential in plain text. Type in the next few commands to secure it.
sudo chown root:root /etc/postfix/sasl_passwd
sudo chmod 0600 /etc/postfix/sasl_passwd
STEP 7
Next, we need to create the hashmap database from the Amazon SES credential file we have just edited. Then we need to secure the hashmap database file as well.sudo postmap hash:/etc/postfix/sasl_passwd
sudo chown root:root /etc/postfix/sasl_passwd.db
sudo chmod 0600 /etc/postfix/sasl_passwd.db
STEP 8
Next we need to set Postifx to use our SSL certificate, then restart postfix to use our new configurations.
sudo postconf -e 'smtp_tls_CAfile = /etc/ssl/certs/ca-certificates.crt'
sudo service postfix restart
STEP 9
Lastly we need to test by sending email to anyone, so that we can be sure our new postfix server configuration via Amazon SES is working.
echo testing | mail -s "this is our test message" -a "From: you@yourdomain.com" user@domain.com
SUMMARY
Hopefully the steps above helped you get your server sending email via Amazon SES.
If you have any comment or question, please drop me a comment. Thanks


No comments:
Post a Comment