Friday, October 13, 2017

Sending email using Amazon SES with POSTFIX for Ubuntu Server

Amazon SES (simple email service) is a good, cheap and reliable service from Amazon. Amazon SES is part of Amazon AWS family of services.  With Amazon SES you will be able to send up to millions of email reliably.

Every Ubuntu server will need to send email to anyone in the world. Having a good reliable email server than you can rely on to relay your email is a must.

Please follow the steps below to configure your ubuntu server to be able to send email via Amazon SES while using Postfix.

PRE-REQUISITES

  1. An active Amazon AWS account
  2. Activate your Amazon SES service
    1. Verify your domain
    2. Verify the email addresses you will be sending from (or your recipient will reply to)

STEP 1

Creating SMTP credential.

Go to 'STMP Settings' in the SES left menu bar.

Click on the button 'Create my STMP Credentials'

STEP 2

Download the 'credentials.csv' file to your computer and open it

STEP 3

Make sure postfix, mailutils are installed on your server.

type the following command in your terminal:

sudo apt-get install postfix mailutils
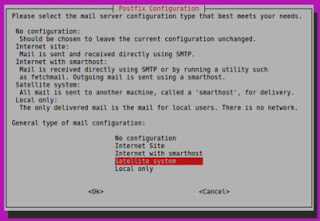
if you have not installed postfix yet, it may ask you the following question (see screenshot below), make sure to answer with 'Satellite System'.


STEP 4

Using your ubuntu server's text editor (nano), edit the postfix main.cf configuration file, type in the command below:
nano /etc/postfix/main.cf
then enter the following content into main.cf and erase everything else:
smtp_sasl_auth_enable = yes
smtp_sasl_security_options = noanonymous
smtp_sasl_password_maps = hash:/etc/postfix/sasl_passwd
smtp_use_tls = yes
smtp_tls_security_level = encrypt
smtp_tls_note_starttls_offer = yes
smtp_tls_CAfile = /etc/ssl/certs/ca-certificates.crt

STEP 5

Using nano again, we will edit the username + password credential file for postfix, type in the command below:
nano /etc/postfix/sasl_password
then enter the following content into sasl_password and erase everything else:
email-smtp.us-east-1.amazonaws.com:25 {your_smtp_username}:{your_smtp_password}

STEP 6 

The postfix password credential file sasl_password must be secured because it contains your Amazon SMTP credential in plain text. Type in the next few commands to secure it.

sudo chown root:root /etc/postfix/sasl_passwd
sudo chmod 0600 /etc/postfix/sasl_passwd

STEP 7

Next, we need to create the hashmap database from the Amazon SES credential file we have just edited. Then we need to secure the hashmap database file as well.

sudo postmap hash:/etc/postfix/sasl_passwd
sudo chown root:root /etc/postfix/sasl_passwd.db
sudo chmod 0600 /etc/postfix/sasl_passwd.db

STEP 8

Next we need to set Postifx to use our SSL certificate, then restart postfix to use our new configurations.
sudo postconf -e 'smtp_tls_CAfile = /etc/ssl/certs/ca-certificates.crt'
sudo service postfix restart

STEP 9 

Lastly we need to test by sending email to anyone, so that we can be sure our new postfix server configuration via Amazon SES is working.

echo testing | mail -s "this is our test message" -a "From: you@yourdomain.com" user@domain.com

SUMMARY 

Hopefully the steps above helped you get your server sending email via Amazon SES.

If you have any comment or question, please drop me a comment. Thanks


Monday, October 2, 2017

Fix NO_PUBKEY issue in Ubuntu Server

This how to will show you how to fix NO_PUBKEY error message like this:

W: GPG error: http://archive.ubuntu.com trusty-updates InRelease: The following signatures couldn't be verified because the public key is not available: NO_PUBKEY 40976EAF437D05B5 NO_PUBKEY 3B4FE6ACC0B21F32
W: GPG error: http://archive.ubuntu.com trusty Release: The following signatures couldn't be verified because the public key is not available: NO_PUBKEY 40976EAF437D05B5 NO_PUBKEY 3B4FE6ACC0B21F32
W: GPG error: http://security.ubuntu.com trusty-security InRelease: The following signatures couldn't be verified because the public key is not available: NO_PUBKEY 40976EAF437D05B5 NO_PUBKEY 3B4FE6ACC0B21F32
W: GPG error: http://archive.canonical.com trusty Release: The following signatures couldn't be verified because the public key is not available: NO_PUBKEY 40976EAF437D05B5 NO_PUBKEY 3B4FE6ACC0B21F32
I got the errors above while doing 'apt-get update' command.

The error messages means apt-get update was trying to download the missing GPG keys (as mentioned in the original error message) from the Ubuntu GPG keyserver. But somehow it failed. So we will try to download (import) those GPG keys manually.

sudo apt-key adv --recv-keys --keyserver keyserver.ubuntu.com 40976EAF437D05B5
sudo apt-key adv --recv-keys --keyserver keyserver.ubuntu.com 3B4FE6ACC0B21F32

The output of the above commands should look like this:

Executing: gpg --ignore-time-conflict --no-options --no-default-keyring --homedir /tmp/tmp.cDJgiBrsSm --no-auto-check-trustdb --trust-model always --keyring /etc/apt/trusted.gpg --primary-keyring /etc/apt/trusted.gpg --recv-keys --keyserver keyserver.ubuntu.com 40976EAF437D05B5
gpg: requesting key 437D05B5 from hkp server keyserver.ubuntu.com
gpg: key 437D05B5: public key "Ubuntu Archive Automatic Signing Key <ftpmaster@ubuntu.com>" imported
gpg: Total number processed: 1
gpg: imported: 1

After successfully imported the GPG Keys you should now be able to continue with 'apt-get update' without any error.

Hope this helps someone. :-)

Wednesday, September 13, 2017

Ubuntu Server 20.04 LTS

When is Ubuntu Server 20.04 LTS will be released?

JUNE 2020.

According to the release frequency and previous history... Canonical (the company behind Ubuntu) has been releasing one version per year. For example, as of this writing 17.04 was released in June 2017. Going with this assumption, it is safe to assume 20.04 should be release around JUNE 2020.

What is the Code Name / Project Name for Ubuntu Server 20.04 LTS?

As of today (September 13, 2017) no name has been selected for Ubuntu Server 20.04 LTS.
If you would like to participate in naming or help suggest a name you can go to this web page:

https://wiki.ubuntu.com/DevelopmentCodeNames

What is the difference between LTS and non-LTS server?

LTS stands for Long Term Support. For Canonical servers LTS means the product will be supported for at least 4-years!  For Ubuntu Servers the LTS series are the servers with version ending in xx.04 such as 16.04, 17.04, 20.04 and so forth.

Ubuntu Release Cycle

Click here to see Ubuntu Release Cycle

Tuesday, September 12, 2017


The new Ubuntu 17.04 "Zesty Zapus" is expected to be released for beta in April 2017 and promises to be packed in new features compared to the current 16.10. Ubuntu 17.04 will include the Linux kernel 4.10.

The kernel 4.10 alone provides important new features, especially for owners of graphics cards equipped with AMD chips. However, Ubuntu 17.04 current is being equipped with Mesa 13.0.4 and the graphical server X.org 1.18.4. Canonical intends to upgrade to Mesa 17.0, but has given no indication of the future date.

Here are some quick highlights:

  • Unity 8
  • Linux Kernel 4.10
  • Use Swap files instead of Swap partitions
  • 32-bit PowerPC support is dropped
  • Driverless printing

KDE, GNOME and others

As for the classic and official variants of Ubuntu, there will be many changes also, depending on the version of the environment chosen. Kubuntu now includes Plasma 5.8 (LTS) as well as the KDE Applications 16.2, the accompanying software suite.

On the GNOME side, 17.04 will bring us to version 3.23.90, which is actually the beta of the 3.24 released earlier. The Control Center is completely revamped, photos can import the snapshots, calendar re-displays the week view and a night mode will make its first debut.

Many Upgrades Everywhere

Many improvements comes with Ubuntu 17.04, spread over several areas. These include the existing applications, with the default use of LibreOffice 5.3, the presence of chrome-gnome-shell which allows the link between browsers (Chrome, Chromium, Opera and Vilvadi) and the GNOME Shell extensions, or the presence of Flatpak 0.8 for applications that take advantage of it. In addition, the DNS resolution is now provided by systemd-resolved.

Some internal changes are also worth taking notes of. For example,The graphics server is still not ready to be used by default, unlike Fedora. It can still be tested since the experimental session devoted to it. The search and indexing engine is also "sandboxed" and the new installations of the system use a swap file rather than a partition.

A few applications have been removed from the default installation, such as Brasero (burning CD / DVD), Evolution (email) or Seahorse (management of keys SSH and GPG). Others did not follow the move to GNOME 3.24 because of problems that have not been resolved. The Evolution stack remains for example in version 3.22, and others - like Nautilus and Terminal - remained at 3.20.

The final release version expected to be on April 13, 2017

The final beta is expected by March 24, 2017. There will then be the typical two-week waiting period during which many bugs and issue will be fixed. Then, the final version of Zesty Zapus will be available for download on April 13, 2017. Its support period will be of 9 months long, Canonical recommending to those needing more support period to remain on the previous Ubuntu LTS 16.04, which will continue to be supported until April 2021.

Sunday, August 20, 2017

Set local time zone for Ubuntu / Debian

Local time zone is important for many application to work properly. Proper time zone is also very important so that when you type 'date' it will not show your date and time in 'utc' time zone.

Here is the command you need to configure time zone on your Ubuntu / Debian:
dpkg-reconfigure tzdata

Tuesday, July 18, 2017

Setting LOCALE for Ubuntu Server from command line CLI

I was getting this type of messages (warning about locale not being set):

perl: warning: Setting locale failed.
perl: warning: Please check that your locale settings:
LANGUAGE = (unset),
LC_ALL = (unset),
LANG = "en_US.UTF-8"
    are supported and installed on your system.
perl: warning: Falling back to the standard locale ("C").


Doing the following commands will set LOCALE settings for your Ubuntu Server so that you will not see those message anymore.

locale-gen "en_US.UTF-8"

The command above will generate locale settings. The output should look like this:

Generating locales (this might take a while)...
  en_US.UTF-8... done
Generation complete. 


Next you need to pick the right LOCALE and it will reconfigure your server to use that LOCALE.

dpkg-reconfigure locales

The command above will output something like this:

Generating locales (this might take a while)...
  en_US.UTF-8... done
Generation complete.


>> You may also like to set the local time zone at this time, click the list below to see how to set your local time zone:

https://ubuntu-server-how-to-tips-tricks.blogspot.com/2017/08/set-local-time-zone-for-ubuntu-debian.html

Wednesday, April 5, 2017

Extending / increasing LVM partition size quickly and while staying online

This guide will show you how to increase the partition or LVM logical volume space.

This quick method only uses 2 commands in CLI, one to extend the Logical Volume (LV) and the other to extend the file system partition itself.

In my experience... I have been able to execute STEP 3 and STEP 4 without having to unmount my file system or partition. Even my server application which is using the /dev/ssd/ssd_data file system stayed online during this process.

STEP 1 - EXAMINE YOUR VOLUME GROUP (VG) SIZE


vgdisplay

  --- Volume group ---
  VG Name               ssd
  System ID
  Format                lvm2
  Metadata Areas        1
  Metadata Sequence No  2
  VG Access             read/write
  VG Status             resizable
  MAX LV                0
  Cur LV                1
  Open LV               1
  Max PV                0
  Cur PV                1
  Act PV                1
  VG Size               159.68 GiB
  PE Size               4.00 MiB
  Total PE              40878
  Alloc PE / Size       20480 / 80.00 GiB
  Free  PE / Size       20398 / 79.68 GiB
  VG UUID               5hhU7Y-fllL-OCn1-UMaa-3IO2-FEX1-8a6daw


STEP 2 - EXAMINE YOUR LOGICAL VOLUME GROUP (LV) SIZE


lvdisplay

  --- Logical volume ---
  LV Path                /dev/ssd/ssd_data
  LV Name                ssd_data
  VG Name                ssd
  LV UUID                v9EA2K-lH9F-eKyq-OtUm-f6Lo-KHVH-qglyQc
  LV Write Access        read/write
  LV Creation host, time a31, 2013-11-21 13:32:47 -0600
  LV Status              available
  # open                 1
  LV Size                80.00 GiB
  Current LE             20480
  Segments               1
  Allocation             inherit
  Read ahead sectors     auto
  - currently set to     256
  Block device           253:1


STEP 3 - INCREASING / EXTENDING LOGICAL VOLUME


lvextend -L +20G /dev/ssd/ssd_data


The above lvextend command will add 20GB to the ssd_data, so the new size should be 100GB.


STEP 4 - RESIZING / INCREASING FILE SYSTEM SIZE


resize2fs /dev/ssd/ssd_data


The above resize command will resize (to maximize the size of the file system to its max capacity which is now +20GB to 100GB).


Tuesday, February 7, 2017

Installing ElasticSearch into Ubuntu 16.04 LTS Xenial - easy list of commands

This is an easy to follow how-to and list of commands to install ElasticSearch into Ubuntu 16.04 LTS (xenial) server

Pre-requisites:

apt-get update


Install Java JRE:

apt-get install default-jre


Download & Install Elasticsearch Debian Package (.deb):

cd /usr/local/src

wget https://download.elastic.co/elasticsearch/release/org/elasticsearch/distribution/deb/elasticsearch/2.3.3/elasticsearch-2.3.3.deb

dpkg -i elasticsearch-2.3.3.deb


Enable Elasticsearch Service (to be able to autostart)

systemctl enable elasticsearch.service


DONE - How to use your new ElasticSearch server

Edit configuration file:

nano /etc/elasticsearch/elasticsearch.yml

Default LOG file location:

/var/log/elasticsearch

Default DATA location:

/var/lib/elasticsearch


To Start ElasticSearch:

systemctl start elasticsearch

To Stop ElasticSearch:

systemctl stop elasticsearch

To Check Status of ElasticSearch:

systemctl status elasticsearch

List of commands to install MongoDB 3.2 to Ubuntu 16.04 LTS Xenial

Here are a list of commands that I have executed to install MongoDB into Ubuntu 16.04 LTS Xenial server.


Pre-requisites:


apt install software-properties-common

apt-get update


Add MongoDB repository:


apt-key adv --keyserver hkp://keyserver.ubuntu.com:80 --recv EA312927
echo "deb http://repo.mongodb.org/apt/ubuntu xenial/mongodb-org/3.2 multiverse" | sudo tee /etc/apt/sources.list.d/mongodb-org-3.2.list
apt-get update


Install MongoDB Server Files:


apt-get install -y mongodb-org


Setup start-up script:


nano /etc/systemd/system/mongodb.service

Insert the following lines of content:

[Unit]
Description=High-performance, schema-free document-oriented database
After=network.target

[Service]
User=mongodb
ExecStart=/usr/bin/mongod --quiet --config /etc/mongod.conf

[Install]
WantedBy=multi-user.target

Enable start-up script:


systemctl enable mongodb


DONE - how to use your new MongoDB:

Configuration file is located here:
/etc/mongodb.conf

To Start service:
systemctl start mongodb

To Stop service:
systemctl stop mongodb

To Check Status of service:
systemctl status mongodb


MongoDB will start automatically on your next server boot process.


Enjoy! -  if you experience any issue - pls leave me a comment. Thanks